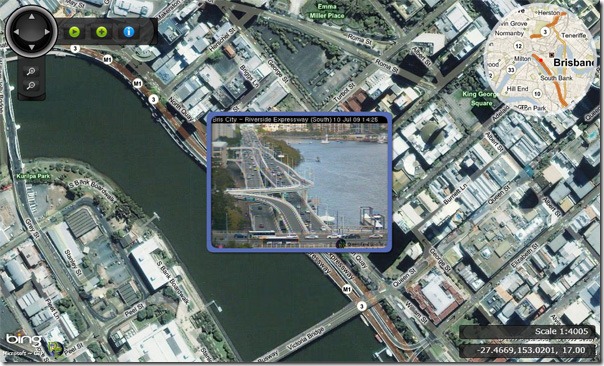
![]() I’m pleased to announced my project has launched for the Azure #newcloudapp international competition. Its called Traffic in the Cloud and provides a rich interactive location twist on public webcams throughout the world.
I’m pleased to announced my project has launched for the Azure #newcloudapp international competition. Its called Traffic in the Cloud and provides a rich interactive location twist on public webcams throughout the world.
So what makes this new and worth checking out? Well apart from the slick DeepZoom Silverlight control (you need another reason?) here is why:
- Give context to the camera images, browse by location and see what is happening live around the world.
- Sit back and enjoy a tour around the world.
- An Azure worker process caches 10 frames of each camera so you can now add some motion to your view even if the source website doesn’t.
- Those frames are made into a sprite as recommended by Jose Farjardo which means CPU usage and scalability rocks
- You can add your own cameras by signing in with a LiveID and filling out a simple form (Approval is needed before it goes live)
- All the controls used are available open source from the DeepEarth project on Codeplex.
- The image pins use PowerLaw scaling automatically deploying into the camera sprite animation based on Zoomlevel and being in your current view to give a slick experience.
Why run in Azure, couldn’t this just be hosted anywhere?
In short no, this application has the potential to scale to host every public webcam in the world, or it could go nowhere. Only a cloud solution that has the ability to scale beyond the limits of a single server and even a single web farm while only requiring you to consume what you now can allow this. The components of the application are:
- Silverlight UI. This file is downloaded and executed on the client allowing the rich interactivity to scale beyond the limits of the hosting server.
- Bing Maps for Enterprise serves the map data from its Content Delivery Network around the globe giving you the best imagery and experience with no impact on the hosting server.
- The WCF service providing the locations and metadata of the camera is hosted in an Azure Web Role with no state, we can add as many of these roles as we need.
- The webcam images themselves are polled once and cached as a sprite image in Azure Blob storage allowing us to directly reference the images on the web.
- The webcam metadata is stored in an Azure Table, one camera per row.
- The polling service is an Azure Worker Role and this is where the smart part of this application lies. Again we can add as many workers as we need.
How do I add my camera?
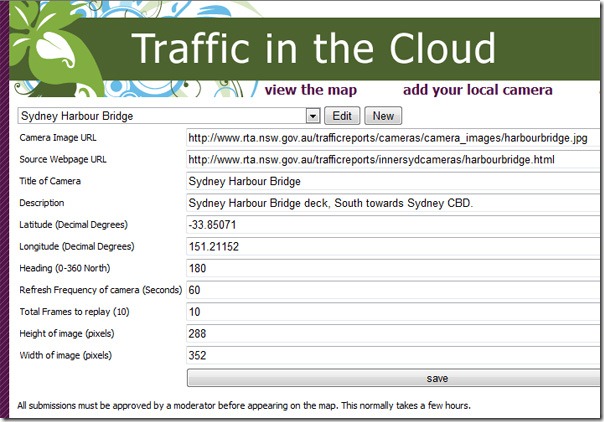
Visit: http://tc.soulsolutions.com.au/add.aspx
You will need to sign in using your existing LiveID or make a new one. All we get when you log in is a GUID to identify you, that’s all. We use this to let you manage your webcams and later we could add new features just for you. For example, a personal tour or embed link of just your cameras.

- Camera Image URL. This is the full image URL of the actual webcam image, we only only support images. The program doesn’t have browser cache issues so no need for timestamp parameters.
- Source Webpage URL. Give credit for the source of the webcam so we can link back to them for users wanting to know more.
- Title of Camera.
- Description.
- Latitude (Decimal Degrees). Why not use my Location Chooser if you don’t know your GPS co-ordinates?
- Longitude (Decimal Degrees).
- Heading (Degrees). North is 0, East is 90, South is 180 and West is 270. When we have the full power of Silverlight3 perspective 3D we can give an even better experience here.
- Refresh Frequency of camera (seconds). Typically 60 seconds.
- Total Frames to replay. Typically 10, @60 seconds that will give 10min snapshot.
- Height of image (pixels). As sometimes the cameras go offline and show a different sized image we need this specified.
- Width of image (pixels). We should create a little helper for this soon however.
When you save it will be stored in your dropdown of cameras but won’t appear on the map straight away. One of our Moderators will need to review the settings you provided and set it to approved. This normally takes a few hours at most. If you edit an approved camera it will also be taken offline and again moderated. We appreciate your patience and I’m sure you understand we don’t want this service abused.
How about some more information into the actual code behind all this?
The Azure Worker Role
An Azure Worker Role is essentially a thread looping forever. You have one implementation of your logic and many, many instances as required. The normal communication channel to distribute the work is an Azure Message Queue. Typically you add stuff to be done to the queue, the hungry workers get them and process them as fast as they can. If your queue gets large you need to add more workers. Importantly the architecture behind Azure allows workers to die or be added at any time, if the message they were processing isn’t completed in satisfactory time it reappears on the queue. Additionally you can’t rely on the Table Storage for synchronising workers as updates can take some time to propagate through the replicated storage.
Now in this application we are working with time. We want a camera to be polled every XX seconds. We don’t want to complicate things with multiple queues or extra tables. I was stumped until I sat down with Joseph Cooney, Bronwen Zande and Joel Pobar and explained the problem over laksa. The solution is quite elegant:
A single queue of all image jobs to be processed, a worker is both a consumer and a producer.
Essentially the worker takes the job off the queue, processes it and then puts the next job on the queue before confirming it has completed the original job. Each job contains a timestamp for when the job should be executed, if it is taken off the queue too early the worker process puts it back. The trick to working out your capacity is no longer how many jobs are on the queue (as this will roughly equal the total number of webcams) but rather the desired processing time versus the actual time an image was processed.
Here is the code:
while (true)
{
    try
    {
        Message msg = imagequeue.GetMessage(Constants.SecondsToExecuteJob);
        if (msg != null)
        {
            var newjob = new ImageJob(msg.ContentAsBytes());
            if (newjob.TimeStamp.CompareTo(DateTime.Now) < 0)
            {
                //update timestamp
                newjob.TimeStamp = DateTime.Now.AddSeconds(newjob.RefreshSeconds);

                //process
                processImage(newjob, container);
            }
            //remove since we have completed successfully
            imagequeue.DeleteMessage(msg);
            //and put back onto the queue
            imagequeue.PutMessage(new Message(newjob.ToXML()));
        }
        else
        {
            Thread.Sleep(1000);
        }
    }
    catch (Exception e)
    {
        RoleManager.WriteToLog(Constants.Critical,
                               string.Format("Exception when processing queue item. Message: '{0}'",
                                             e.Message));
    }
}
Cached Sprite
The idea of this application is to provide an improved experience and features by combining new technology with aggregated data. The webcam images remain the property of the source, we don’t want to store these images and run into legal issues, instead we cache just the last XX images in a single publically addressable image sprite. These sprites use incredibly low cpu usage when animated in Silverlight, I tested 10 of these running at 1-2% cpu for the whole Silverlight application. I have to thank Jose Farjardo who suggested this in his remix Australia talk last month. This is the code I used:
private void Begin()
{
    var element = new Rectangle
                      {
                          Width = Width,
                          Height = Height
                      };

    var spriteSheet = new ImageBrush
                          {
                              Stretch = Stretch.None,
                              AlignmentX = AlignmentX.Left,
                              AlignmentY = AlignmentY.Top
                          };

    var sprite_sheet_position = new TranslateTransform();
    spriteSheet.Transform = sprite_sheet_position;
    spriteSheet.ImageSource = ImageSource;

    element.Fill = spriteSheet;

    var sprite_anim = new DoubleAnimationUsingKeyFrames();
    for (int i = 0; i < Frames; i++)
    {
        var frame_span = new TimeSpan(0, 0, 0, 0, i*MilliSecondsPerFrame);
        sprite_anim.KeyFrames.Add(new DiscreteDoubleKeyFrame
                                      {
                                          Value = (-Width*((Frames-i)-1)),
                                          KeyTime = KeyTime.FromTimeSpan(frame_span)
                                      });
    }

    sb = new Storyboard {RepeatBehavior = RepeatBehavior.Forever};
    sb.Children.Add(sprite_anim);
    Storyboard.SetTarget(sprite_anim, sprite_sheet_position);
    Storyboard.SetTargetProperty(sprite_anim,
                                 new PropertyPath(TranslateTransform.XProperty));
    sb.Begin();

    LayoutRoot.Children.Add(element);
}
DeepEarth
Regular readers of my blog know we have been working with Silverlight DeepZoom and mapping since the dawn of time (Mix2008) and have had a great many people contribute to the project on codeplex. The DeepEarth project has evolved into a toolkit of Silverlight controls and components for mapping. With the released of the Bing Maps Silverlight CTP we have been busy make our controls compatible, extensible and blendable. Lets take a look at the controls used in this application and how you can use them in your application as well.
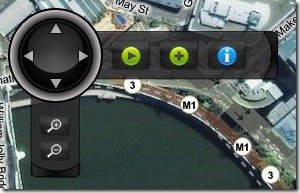
Navigation Control
http://deepearth.codeplex.com/Wiki/View.aspx?title=Navigation%20Panel

Custom navigation control with pan and zoom controls and a panel for custom functionality, simple add what content you’d like to have on the horizontal arm inside a panel as a child element.
<n:NavigationPanel x:Name="navpanel" MapName="map" HorizontalAlignment="Left" VerticalAlignment="Top" Margin="8,8,8,8" >
    <StackPanel Orientation="Horizontal">
        <Button x:Name="btnPlay" Click="btnPlay_Click"  ToolTipService.ToolTip="Play" Style="{StaticResource StandardButton}" Margin="4,8,4,8">
            <Image Source="Resources/play.png" Width="24" Height="24" />
        </Button>
        <Button x:Name="btnPause" Click="btnPause_Click" Visibility="Collapsed" ToolTipService.ToolTip="Pause" Style="{StaticResource StandardButton}" Margin="4,8,4,8">
            <Image Source="Resources/pause.png" Width="24" Height="24" />
        </Button>
        <Button x:Name="btnAdd" Click="btnAdd_Click" ToolTipService.ToolTip="Add a camera" Style="{StaticResource StandardButton}" Margin="4,8,4,8">
            <Image Source="Resources/plus.png" Width="24" Height="24" />
        </Button>
        <Button x:Name="btnAbout" Click="btnAbout_Click" ToolTipService.ToolTip="About this application" Style="{StaticResource StandardButton}" Margin="4,8,4,8">
            <Image Source="Resources/info.png" Width="24" Height="24" />
        </Button>
    </StackPanel>
</n:NavigationPanel>
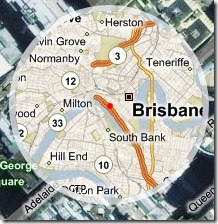
MiniMap
http://deepearth.codeplex.com/Wiki/View.aspx?title=Mini%20Map%20Panel

Second Map control to provide overview location of main map and full navigation. Brian from Earthware authored the first version here.
<mm:MiniMap Name="minimap" MapName="map" HorizontalAlignment="Right" VerticalAlignment="Top" />
Coordinate Panel
http://deepearth.codeplex.com/Wiki/View.aspx?title=Coordinate%20Panel
![]()
The coordinate panel displays current coordinate information for the mouse position.
<c:CoordinatePanel x:Name="coord" MapName="map" HorizontalAlignment="Right" VerticalAlignment="Bottom" Margin="8,8,8,8" />
Scale Panel
http://deepearth.codeplex.com/Wiki/View.aspx?title=Scale%20Panel
![]()
Information Panel showing the current scale of the map.
<s:ScalePanel x:Name="scalepanel" MapName="map" HorizontalAlignment="Right" VerticalAlignment="Bottom" Margin="8,8,8,41" />
Persistent State
http://deepearth.codeplex.com/Wiki/View.aspx?title=Persisted%20State%20Control
Non visual control to maintain the users state between sessions. Uses the Isolated Storage in Silverlight to store a serialized object contain view and mode values.
DeepEarth Logo
http://deepearth.codeplex.com/Wiki/View.aspx?title=DeepEarth%20Logo%20Control
![]()
A simple helper control to easily add the most current DeepEarth logo and link to your application in support of this project.
<l:Logo x:Name="logo" HorizontalAlignment="Left" VerticalAlignment="Bottom" Margin="80,8,8,8" />
Vote for Traffic in the Cloud!
If you like the application then give it your vote over at http://www.newcloudapp.com/vote.aspx
Its under John OBrien, about half way down the list of other cool apps.
Future Enhancements
What would you like to see? let me know in the comments, here are my ideas in no specific order.
- Location chooser on the add page powered by Bing maps, rather then having to enter your lat/long and also to double check and adjust (fine tune)
- Image URL validation, show the image you have supplied and also automatically fill out the height and width.
- Links overlaid on the sprite to link back to the original source, plus permalink options / embed links etc.
- Permalink for each camera
Tour mode, automatic navigation slideshow around the world- Statistics, number of views per camera
- View just your cameras on the map, permalink and optimised starting point.
- Embed snippet to put the map on your site.
- Refresh of sprite within map so you can sit on specific camera
- Find control, both general locations and locations with cameras
Silverlight 3 upgrade (when released)
- perspective 3D to give context to heading of camera
- pixel shader effects during transition
- refactor popout effect as a behaviour


