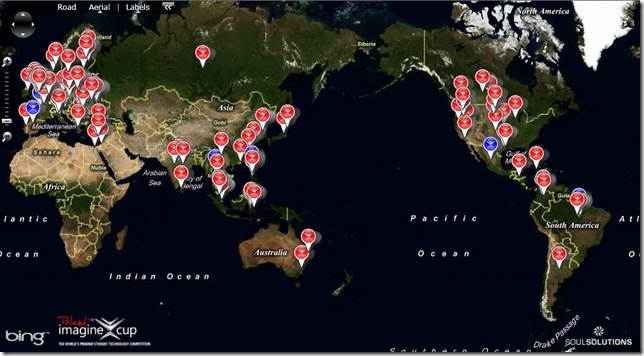
![]() After our talk at Remix in Melbourne yesterday, I thought I’d post about how to create the Imagine Cup Game Design Round 2 competitor Mash-Up. Before I created the application I created my own database and table with all the Round 2 contestants and geo-coded their country locations. Since the six finalists have been announced I thought I’d expand it a bit and show those in a different colour. We’ve deployed the final copy to http://imaginecup.soulsolutions.com.au/
After our talk at Remix in Melbourne yesterday, I thought I’d post about how to create the Imagine Cup Game Design Round 2 competitor Mash-Up. Before I created the application I created my own database and table with all the Round 2 contestants and geo-coded their country locations. Since the six finalists have been announced I thought I’d expand it a bit and show those in a different colour. We’ve deployed the final copy to http://imaginecup.soulsolutions.com.au/

I created a Silverlight Application Called Imagine Cup. Then I created a simple Linq to SQL class to get my team table and created a service method call GetTeams
[OperationContract]
public List<Team> GetTeams()
{
    var db = new DataClassesDataContext();
    return db.Teams.Where(a => a.Latitude != null).ToList();
}
In the ImagineCup Project we add a reference to the following:
- Microsoft.Map.MapControl
- Microsoft.Map.MapControl.Common
In the MainPage.xaml we add the mapcontrol namespace:
xmlns:m="clr-namespace:Microsoft.Maps.MapControl;assembly=Microsoft.Maps.MapControl"
and add the map control to the grid:
<m:Map CredentialsProvider="yourkey"
   CopyrightVisibility="Collapsed"
   ScaleVisibility="Collapsed"
   Mode="Aerial" >
    <m:MapItemsControl x:Name="ListOfItems"/>
</m:Map>
Add a service reference to your Web Service. In the MainPage.xmal.cs add the logic to retrieve your teams and set the mapitems item source to the data.
public MainPage()
{
    InitializeComponent();
    Loaded += MainPage_Loaded;
}

void MainPage_Loaded(object sender, RoutedEventArgs e)
{
    var ds = new DataServiceClient();
    ds.GetTeamsCompleted += ds_GetTeamsCompleted;
    ds.GetTeamsAsync();
}

void ds_GetTeamsCompleted(object sender, GetTeamsCompletedEventArgs e)
{
    ListOfItems.ItemsSource = e.Result;
}
Back in the MainPage.xmal we need to create a datatemplate for the items:
<DataTemplate x:Key="ItemTemplate">
    <m:Pushpin m:MapLayer.Position="{Binding .}">
    </m:Pushpin>
</DataTemplate>
and assign that template to the mapitemsControl
<m:Map CredentialsProvider="Ag6yz6PTjH6E3eJYr5FJZfiuKPSkiQeyFqicEfpD5AvUbSliE9FLDE01b-1Rjjtr"
   CopyrightVisibility="Collapsed"
   ScaleVisibility="Collapsed"
   Mode="Aerial" >
    <m:MapItemsControl x:Name="ListOfItems" ItemTemplate="{StaticResource ItemTemplate}"/>
</m:Map>
As we’re displaying a Team entity we need to convert the latitudes and longitudes into something the map control knows about. The easiest way to do this is using a converter. Create TeamToLocationConverter:
using System;
using System.Globalization;

namespace ImagineCup
{
    public class TeamToLocationConverter : IValueConverter
    {
        public object Convert(object value, Type targetType, object parameter, CultureInfo culture)
        {
            var team = value as Team;
            if (team == null) return null;

            return new Location
            {
                Latitude = team.Latitude.GetValueOrDefault(0),
                Longitude = team.Longitude.GetValueOrDefault(0)
            };
        }

        public object ConvertBack(object value, Type targetType, object parameter, CultureInfo culture)
        {
            throw new NotImplementedException();
        }
    }
}
Add a reference to the converter in the MainPage.xaml:
xmlns:Converter="clr-namespace:ImagineCup"
so that we can create a converter resource:
<Converter:TeamToLocationConverter x:Key="teamConverter"/>
and then apply the converter to the pushpin binding in the DataTemplate you created earlier:
<DataTemplate x:Key="ItemTemplate">
    <m:Pushpin m:MapLayer.Position="{Binding ., Converter={StaticResource teamConverter}}">
    </m:Pushpin>
</DataTemplate>
To add the ImageCup logo to the pushpin we need to override it’s content as follows:
<DataTemplate x:Key="ItemTemplate">
    <m:Pushpin m:MapLayer.Position="{Binding ., Converter={StaticResource teamConverter}}">
        <m:Pushpin.Content>
            <Grid>
                <Image Source="images/logo.png" Width="20" Stretch="Uniform" />
            </Grid>
        </m:Pushpin.Content>
    </m:Pushpin>
</DataTemplate>
As we then want to change the background colour of the pin to make it a bit more visible so we set it to dark blue:
<m:Pushpin Background="DarkBlue" m:MapLayer.Position="{Binding ., Converter={StaticResource teamConverter}}">
Next we want to see more data about each of the teams so we use the tooltip and override it’s style to display information about the teams. Add your tooltip style:
<Style x:Key="CustomInfoboxStyle" TargetType="ToolTip">
    <Setter Property="Background" Value="Transparent" />
    <Setter Property="BorderBrush" Value="Transparent" />
    <Setter Property="BorderThickness" Value="0" />
    <Setter Property="Template">
        <Setter.Value>
            <ControlTemplate>
                <Border CornerRadius="5">
                    <Border.Background>
                        <SolidColorBrush Color="Black" Opacity="0.5"/>
                    </Border.Background>
                    <ContentPresenter Margin="5">
                        <ContentPresenter.Content>
                            <StackPanel Margin="5">
                                <StackPanel Orientation="Horizontal">
                                    <Image Source="{Binding Logo}" Width="50" Margin="0,0,10,0" />
                                    <TextBlock Text="{Binding Name}" FontWeight="Bold" FontSize="16" Foreground="White"/>
                                </StackPanel>
                                <TextBlock Text="{Binding Country}" FontWeight="Bold" FontSize="12" Foreground="White"/>
                                <Image Source="{Binding TeamPhoto}" Width="400"/>
                            </StackPanel>
                        </ContentPresenter.Content>
                    </ContentPresenter>
                </Border>
            </ControlTemplate>
        </Setter.Value>
    </Setter>
</Style>
and apply that style to the pushpin tooltip:
<DataTemplate x:Key="ItemTemplate">
<m:Pushpin Background="DarkBlue" m:MapLayer.Position="{Binding ., Converter={StaticResource teamConverter}}">
<m:Pushpin.Content>
<Grid>
<Image Source="images/logo.png" Width="20" Stretch="Uniform" />
</Grid>
</m:Pushpin.Content>
<ToolTipService.ToolTip>
<ToolTip Style="{StaticResource CustomInfoboxStyle}" />
</ToolTipService.ToolTip>
</m:Pushpin>
</DataTemplate>
To extend the example we’ll display the 6 finalists in Blue and everyone who made it to round 2 in Red. To do this we’ll use a field in the database called Finalist and a converter to choose what colour to set the pin to. So were create a new converter called TeamtoBackgroundConverter:
using System.Windows.Media;
using ImagineCup.DataService;
using System.Windows.Data;
using System;
using System.Globalization;

namespace ImagineCup
{
    public class TeamToBackgroundConverter : IValueConverter
    {
        public object Convert(object value, Type targetType, object parameter, CultureInfo culture)
        {
            var team = value as Team;
            if (team == null) return null;
            if (team.Finalist.GetValueOrDefault())
            {
                return new SolidColorBrush(Colors.Blue);
            }
            return new SolidColorBrush(Colors.Red);
        }

        public object ConvertBack(object value, Type targetType, object parameter, CultureInfo culture)
        {
            throw new NotImplementedException();
        }
    }
}
Add it as a resource in our main page:
<Converter:TeamToBackgroundConverter x:Key="backgroundConverter"/>
and finally add the converter to the pin background colour:
<m:Pushpin Background="{Binding ., Converter={StaticResource backgroundConverter}}" m:MapLayer.Position="{Binding ., Converter={StaticResource teamConverter}}">
